Note
Currently, GeekAI supports the following payment channels:
- Alipay: Official Alipay payment channel with low transaction fees. Requires enterprise qualifications for application.
- Hupi Pepper: Aggregated payment channel supporting both WeChat Pay and Alipay. Simple application process, supports individual applications. Activation fee: 118, transaction fee: 1-2% + 0.6%.
- PayJs: Aggregated payment channel supporting only WeChat Pay. Easy and fast with comprehensive SDK. Supports individual applications, no activation fee, transaction fee: 1% + 0.6%.
Alipay Configuration
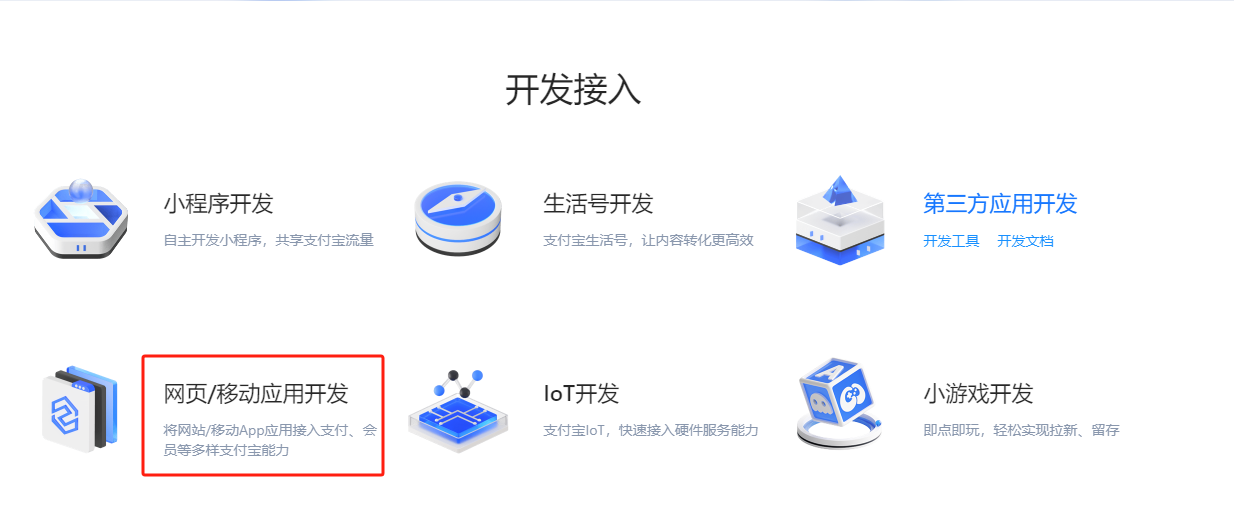
First, log in to the Alipay Open Platform using Alipay QR code, then click the "Web/Mobile App Development" button.
Production Environment
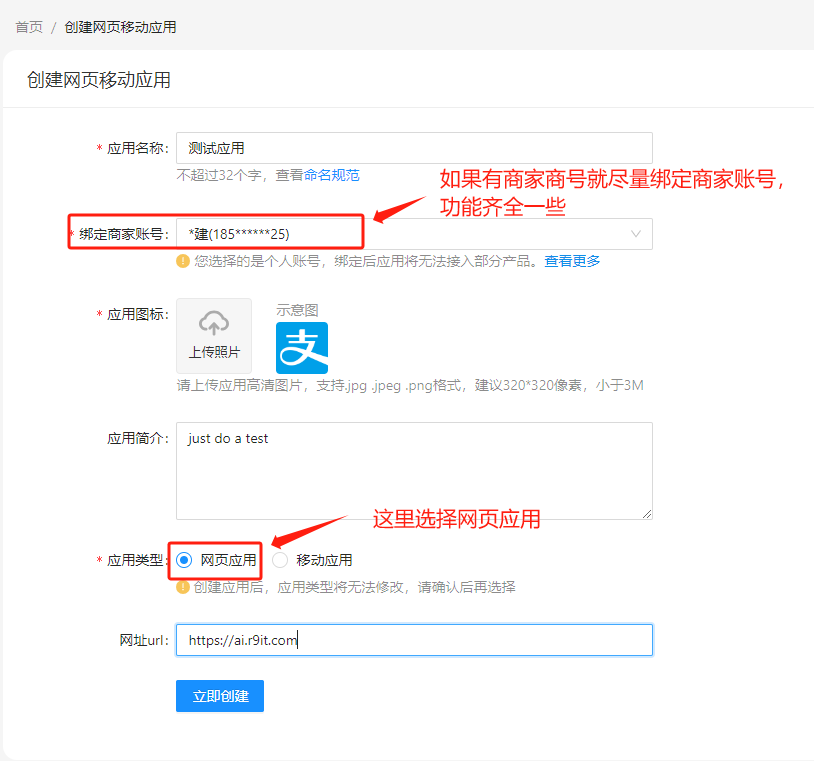
Go to the app creation page and click Create Now. Fill in the relevant app information and submit for review.
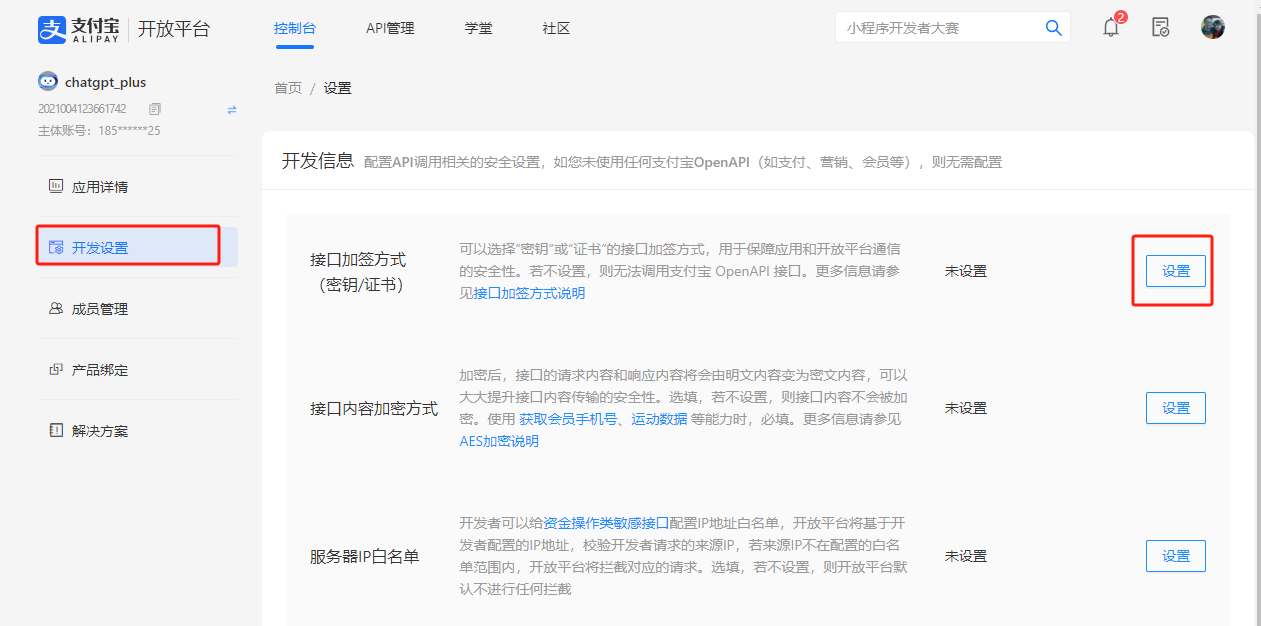
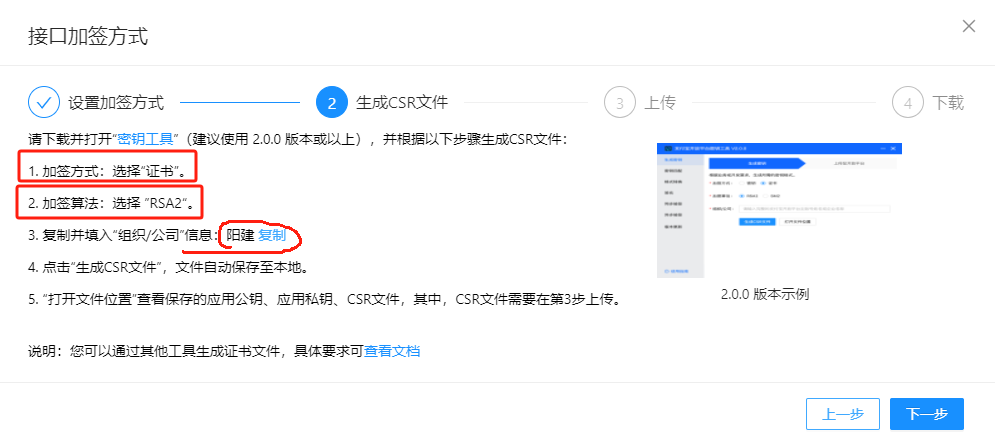
After approval, you can proceed with development settings. The main focus is on setting the "Signature Method." For "Content Encryption Method," "Server IP Whitelist," and "Authorization Callback URL," you can configure them as needed. It is recommended to set these for the production environment for enhanced security.
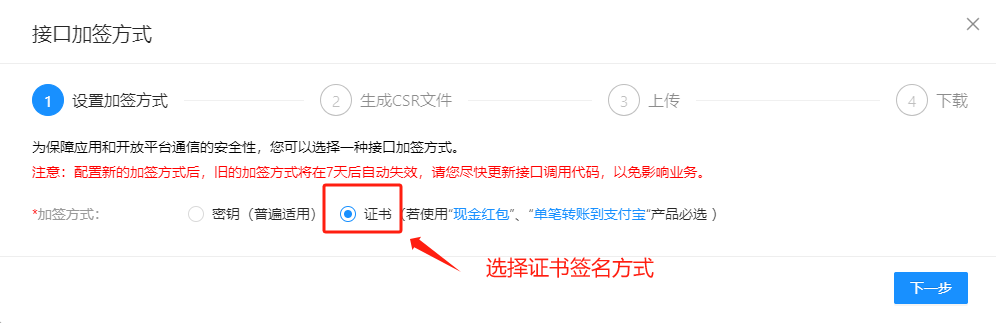
Select the certificate signature method, which is also used in this project.
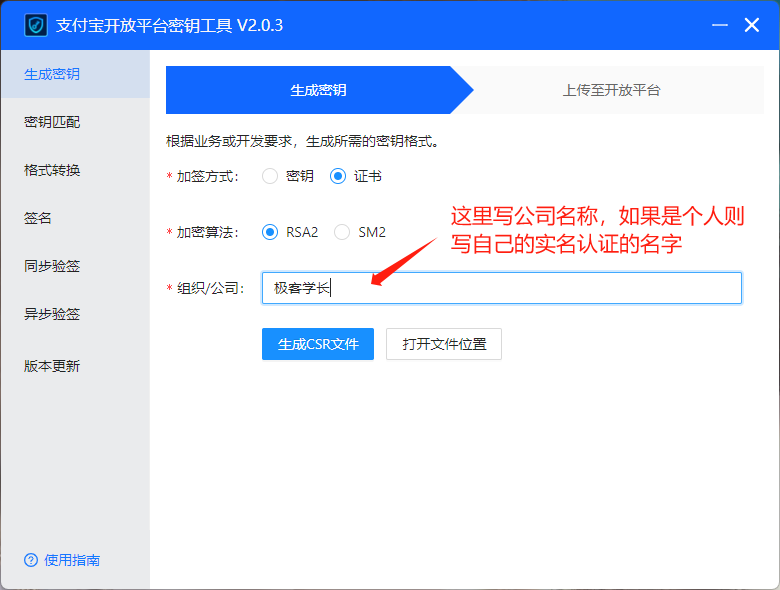
Next, download and install Alipay's Key Tool.
Follow the instructions to create a key:
Select the .csr suffix key file:
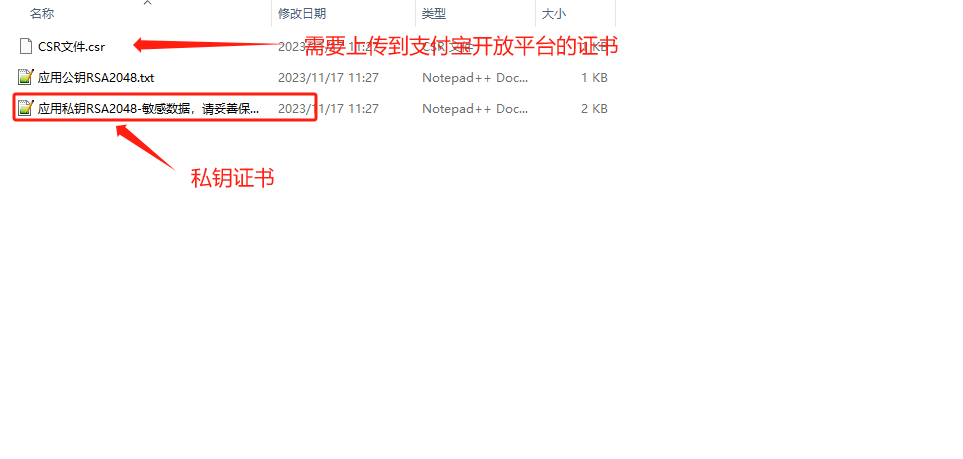
Upload the generated certificate to the Alipay Open Platform:
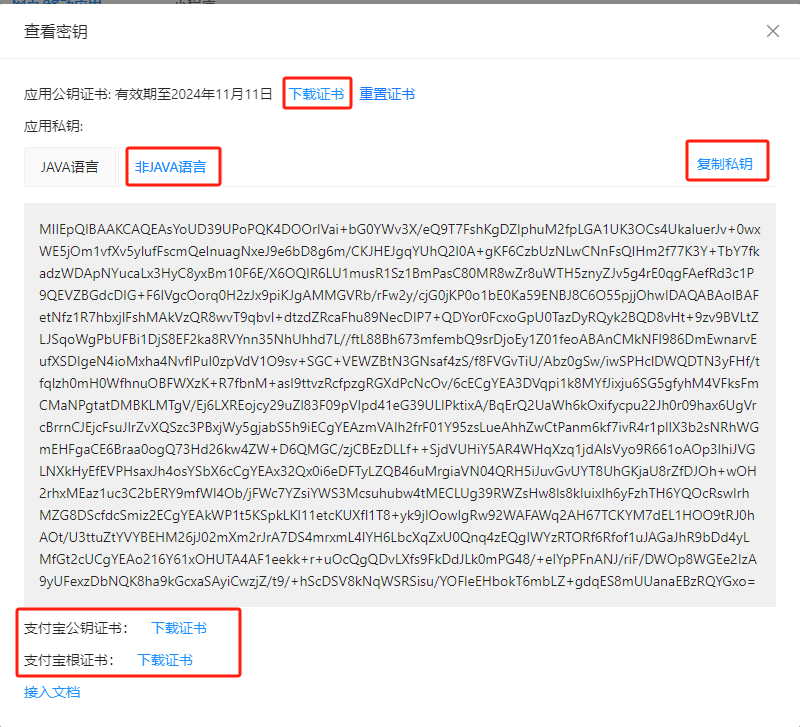
After successful upload, Alipay will generate corresponding app public key certificate and Alipay public key certificate. Download these certificates.
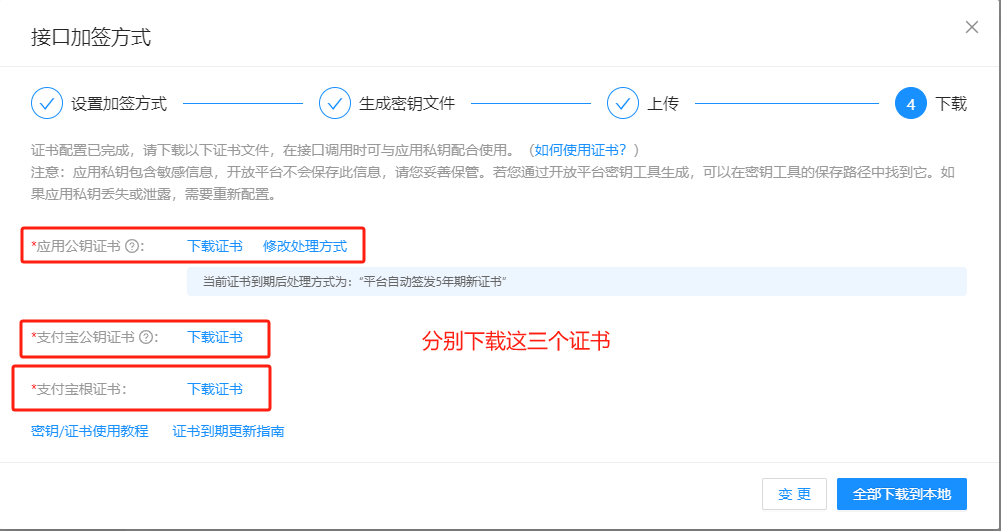
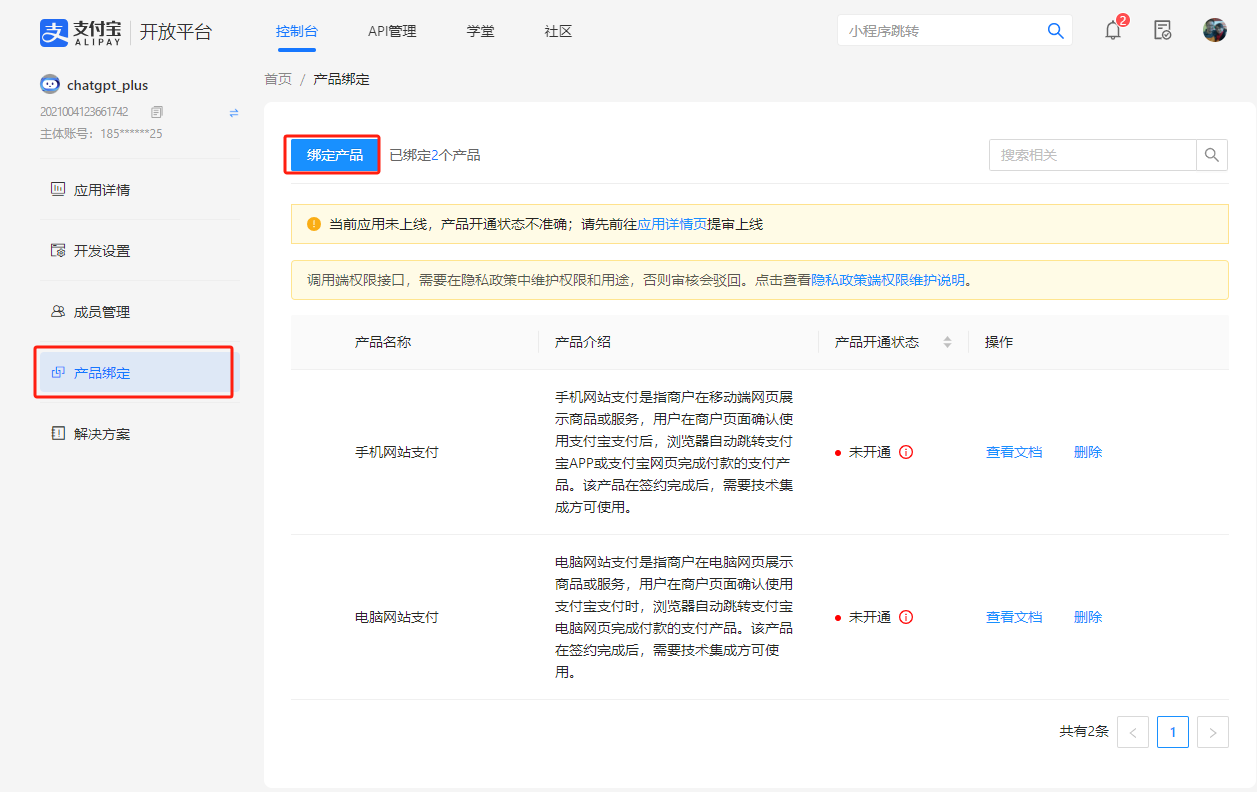
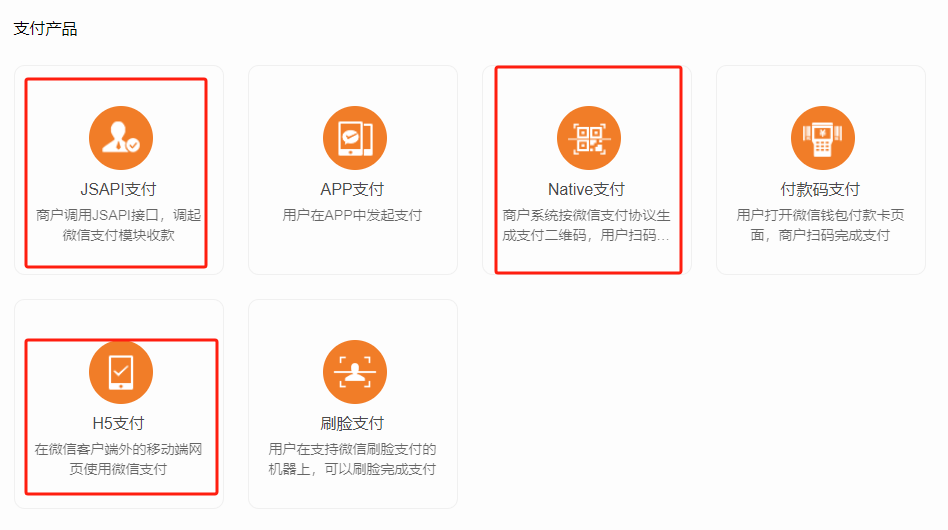
Bind products. This project only uses "Mobile Website Payment" and "PC Website Payment," so bind these two.
Configure the app information and certificates in the config.toml file. Copy the certificates to the cert/alipay directory.
[AlipayConfig]
  Enabled = true # Enable Alipay payment channel
  SandBox = false # Enable sandbox mode? Set to false for production
  AppId = "9021000131658023" # App ID
  PrivateKey = "certs/alipay/privateKey.txt" # App private key
  PublicKey = "certs/alipay/appPublicCert.crt" # App public key certificate
  AlipayPublicKey = "certs/alipay/alipayPublicCert.crt" # Alipay public key certificate
  Domain = "https://chat.geekai.me" # Your website domain
Note:
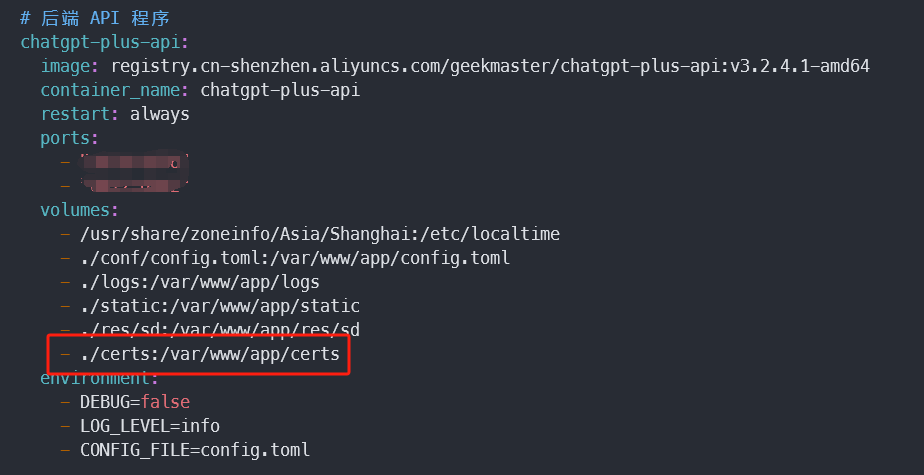
The final step is to copy your certificate files to the certs/alipay directory, ensuring the names match the configuration above. Modify the docker-compose.yaml file:
Sandbox Environment
If you want to test the payment logic locally, you may need a sandbox environment. Creating a sandbox is simple. Go to the Alipay Open Platform Console, navigate to the "Recommended Development Tools" section, and select Sandbox.
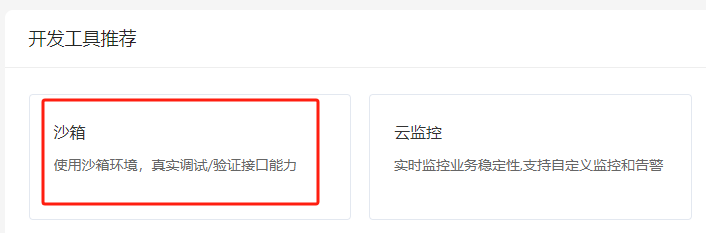
Clicking will take you directly to the sandbox panel. Minimal setup is required, and no approval is needed for immediate use.
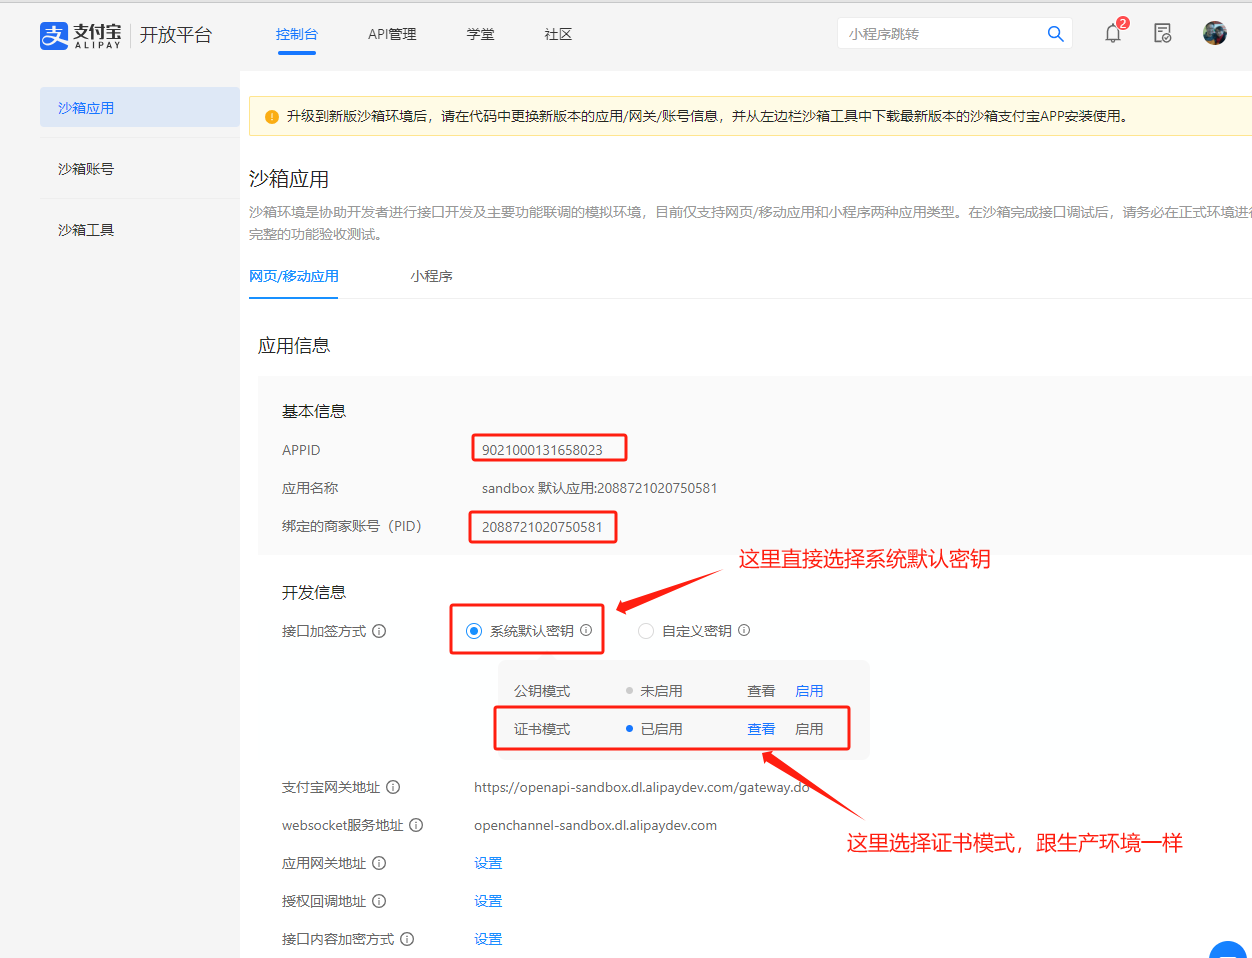
Download the certificates, copy the private key to privateKey.txt, and fill in the merchant ID and APPID in the configuration file. Done.
After configuration, restart the application:
docker-compose down
docker-compose up -d
WeChat Pay Configuration
Account Application
First, apply for a merchant payment account on the WeChat Pay Open Platform.
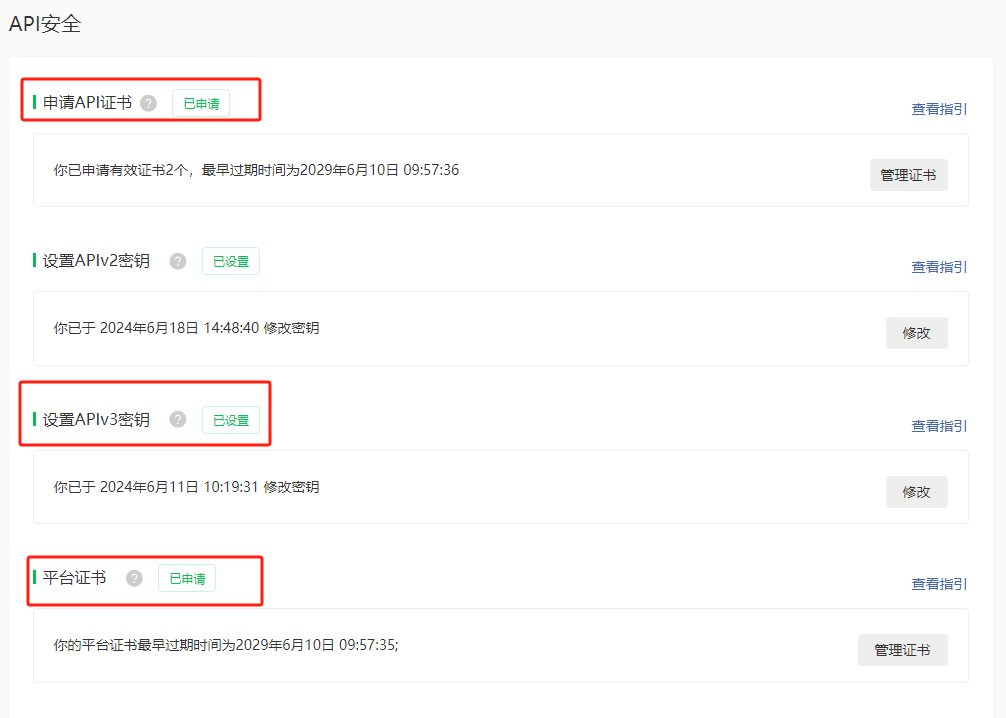
Second, go to API Security to apply for "API Certificate," "APIv3 Key," and "Platform Certificate."
Third, go to the Product Center to apply for the corresponding payment products.
Fourth, go to the Merchant Information page to obtain the WeChat Pay Merchant ID.
Payment Configuration
Fill in the obtained information in the configuration file conf/config.toml:
[WechatPayConfig]
  Enabled = true
  AppId = "" # App ID
  MchId = "" # Merchant ID
  SerialNo = "" # API Certificate Serial Number
  PrivateKey = "res/certs/wechat/apiclient_key.pem" # Copy the private key to the specified directory
  ApiV3Key = "" # APIv3 Key
  Domain = "https://chat.geekai.me" # Your website domain
After configuration, restart the container:
docker-compose down
docker-compose up -d
EasyPay Setup
EasyPay is an excellent aggregated payment tool. GeekPay is a multifunctional aggregated payment system based on EasyPay, supporting individual accounts and daily withdrawals. Currently, there is a promotion with no activation fee🎉🎉🎉.
Integration is simple. First, register a merchant account on the GeekPay Official Page, then log in to the merchant payment management backend and navigate to "Personal Profile" -> "API Information."
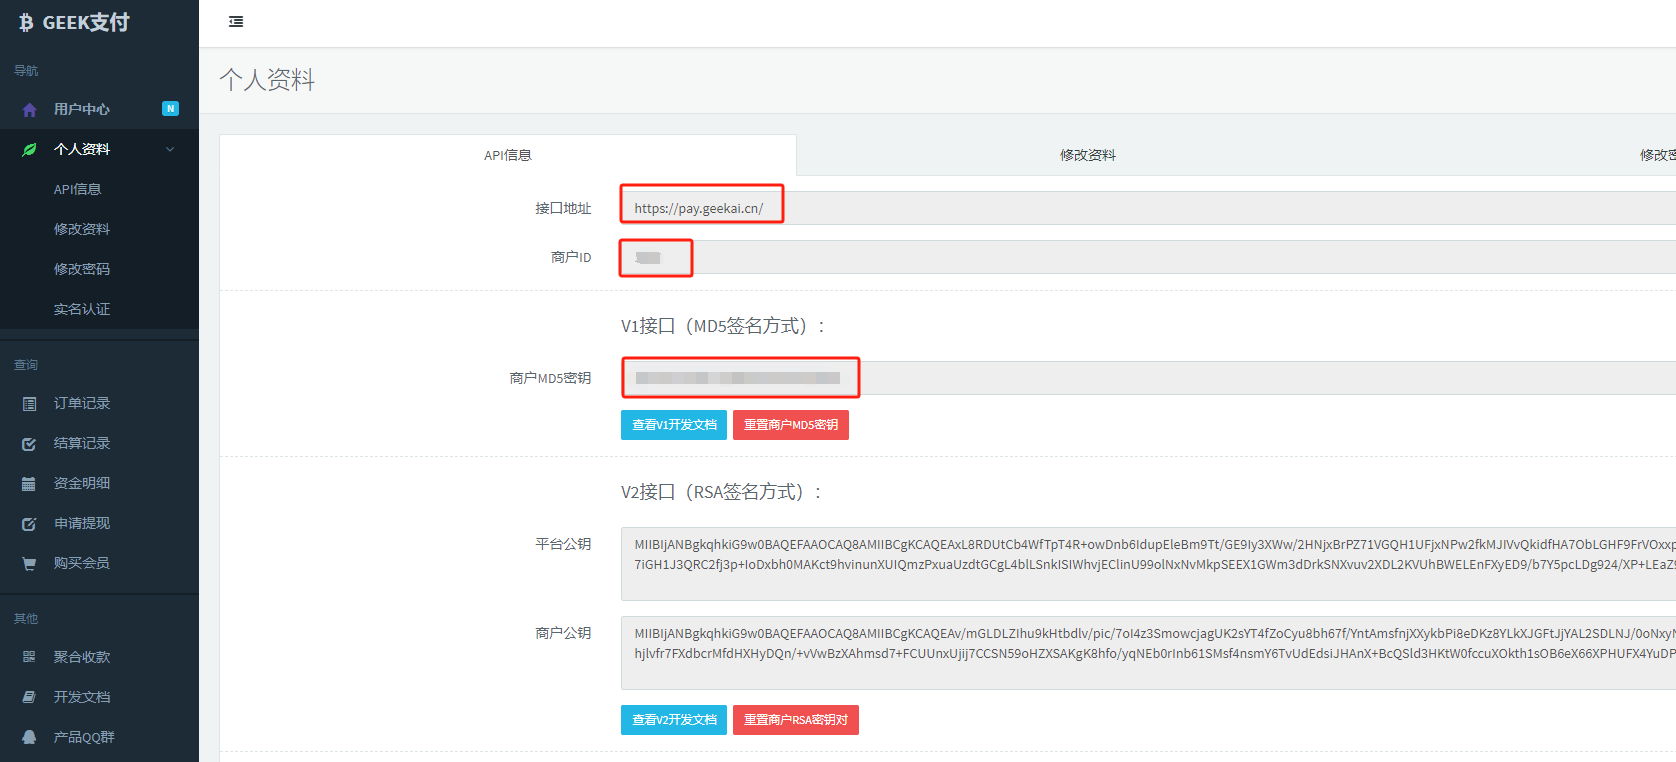
Second, fill in the payment API information directly in GeekAI's configuration file conf/config.toml:
[GeekPayConfig]
  Enabled = true
  AppId = "" # Merchant ID
  PrivateKey = "" # Merchant Private Key
  ApiURL = "https://pay.geekai.cn" # Payment Gateway API URL
  Methods = ["alipay", "wxpay", "qqpay", "jdpay", "douyin", "paypal"] # Supported Payment Methods
  Domain = "https://chat.geekai.me" # Your Website Domain
After configuration, restart the application:
docker-compose down
docker-compose up -d
Common Issues
- After enabling payment, the geekai-api container fails to start, and API access returns a 502 error.
This error usually occurs due to failed certificate loading. Check the following:
First, ensure the payment paths in conf/config.toml are correct.
If your keys and certificates are in the certs directory (same level as docker-compose.yaml), the directory structure should look like this:
certs/
└── alipay
    ├── alipayPublicCert.crt
    ├── alipayRootCert.crt
    ├── appPublicCert.crt
    └── privateKey.txt
Your payment configuration should resemble the following:
[AlipayConfig]
  Enabled = true
  SandBox = false
  AppId = ""
  UserId = ""
  PrivateKey = "certs/alipay/privateKey.txt"
  PublicKey = "certs/alipay/appPublicCert.crt"
  AlipayPublicKey = "certs/alipay/alipayPublicCert.crt"
  RootCert = "certs/alipay/alipayRootCert.crt"
  NotifyURL = "https://r9it.com/api/payment/alipay/notify"
  ReturnURL = ""
Second, mount the certs directory to your geekai-api Docker container by modifying docker-compose.yaml:
# Backend API
geekai-api:
  image: registry.cn-shenzhen.aliyuncs.com/geekmaster/geekai-plus-api:v4.0.9.2-amd64
  container_name: geekai-api
  restart: always
  ports:
    - '5678:5678'
    - '6012:6012'
  volumes:
    - /usr/share/zoneinfo/Asia/Shanghai:/etc/localtime
    - ./conf/config.toml:/var/www/app/config.toml
    - ./static:/var/www/app/static
    - ./certs:/var/www/app/certs # Mount certs directory
    - ./data:/var/www/app/data
  environment:
    - CONFIG_FILE=config.toml
- Why are there no payment buttons under the "Membership Plan" page after configuring the payment channels?
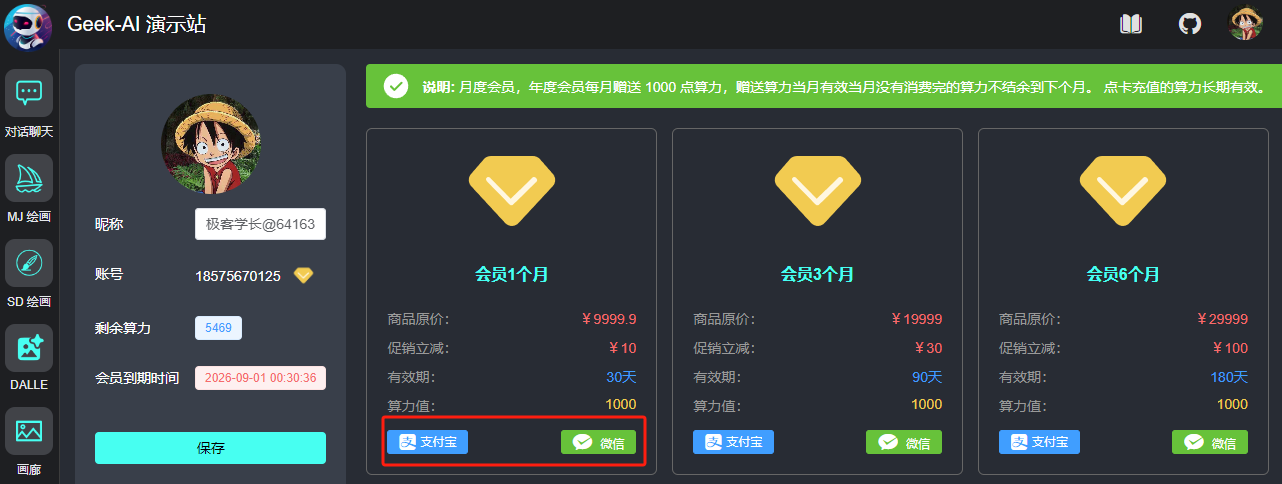
Missing payment buttons usually indicate that no payment channels are enabled. Check the Enabled field in each payment configuration section of config.toml and ensure it is set to true.
Enabled = true
AppId = ""
UserId = ""
PrivateKey = "certs/alipay/privateKey.txt"
PublicKey = "certs/alipay/appPublicCert.crt"