MidJourney Service Configuration
Note: Before reading this chapter, please ensure you know how to access Discord and create a server.
1. Adding the MidJourney Bot
First, you need to invite the MidJourney bot to your created server. Click on the MidJourney bot icon -> Select "Add App".

In the pop-up dialog, select the server you just created.
After adding, it will automatically redirect to your created server. At this point, you can also obtain the channel ID (ChannelId) and server ID (GuildId) configuration parameters.
2. Obtaining the User Login Token
Log in to the Discord web version, press F12 to open the developer tools, and then refresh the page. Refer to the image below, click on "Network," and find the Authorization field in the request headers. This is the UserToken parameter.
3. Obtaining the Bot Token
Next, we need the final configuration item: the bot token (BotToken). First, we need to create a bot. The creation address is: https://discord.com/developers/applications.
Click the "New Application" button in the upper right corner, enter the bot name, and the creation will be successful.
After the bot is created, there is no token by default. Click on the "Bot" menu on the left, then select the "Reset Token" button on the right to reset the token.
This way, we obtain the BotToken parameter.
4. Assigning Permissions to the Bot
Please note that the bot should not be usable at this point because you have not configured permissions for it. First, open the "Bot" menu and set the bot's Privileged Gateway Intents. Enable the permissions for message persistence and reading message content.
Continue by clicking on the "OAuth2" -> "URL Generator" menu on the left, select "Bot," and then add permissions for the bot in the options below.
Our bot only needs the following three permissions:
- Send Message: Send messages
- Read Message History: Read historical messages
- Use Slash Commands: Use slash commands, such as MidJourney's
/imagecommand.
Of course, you can add more permissions based on your needs. Then, copy the authorization link below and open it in a browser.
Select the server you just created and add the bot.
At this point, the configuration for the MidJourney bot is complete. Fill in the configuration information obtained above into the conf/mj-proxy/application.yml configuration file.
mj:
  task-store:
    type: in_memory
    timeout: 30d
  translate-way: null
  api-secret: "sk-geekmaster" # API key, must match the `config.toml` configuration in the GeekAI application, otherwise API calls will fail

  ng-discord: # A proxy must be configured here; otherwise, the Discord API cannot be accessed
    server: "" # Discord API proxy
    cdn: "" # Discord image CDN proxy
    wss: "" # Discord gateway proxy

  accounts: # MJ accounts, multiple can be configured
    - guild-id: "" # Server ID
      channel-id: "" # Channel ID
      user-token: "" # UserToken parameter
      user-agent: "Mozilla/5.0 (Windows NT 10.0; Win64; x64) AppleWebKit/537.36 (KHTML, like Gecko) Chrome/122.0.0.0 Safari/537.36"
MidJourney-Proxy Service Configuration
Following the principle of not reinventing the wheel, starting from version 4.0.1, GeekAI removed the built-in MidJourney bot implementation and switched to the third-party open-source component midjourney-proxy. This article will demonstrate how to deploy and integrate the midjourney-proxy service.
1. Features
- Supports Imagine commands and related actions
- Supports adding base64 images as references during Imagine
- Supports Blend (image mixing) and Describe (image-to-text) commands
- Supports real-time task progress tracking
- Supports Chinese prompt translation (requires configuring Baidu Translate or GPT)
- Pre-detection of sensitive words in prompts, with support for adjustments
- Uses
user-tokento connect to WSS, enabling error messages and full functionality - Supports multi-account configuration, with each account having its own task queue
2. Deployment
It is recommended to use Docker for deployment. First, create a docker-compose.yaml file and copy the following content into it:
version: '3'
services:
  midjourney-proxy:
    image: novicezk/midjourney-proxy:2.6.0
    container_name: midjourney-proxy
    restart: always
    ports:
      - "8080:8080"
    volumes:
      - ./conf:/home/spring/config
Then, create a conf configuration directory:
mkdir confCreate a configuration file conf/application.yml and input the following configuration information:
mj:
  task-store:
    type: in_memory
    timeout: 30d
  translate-way: null
  api-secret: 'sk-geekmaster' # API key, must match the `config.toml` configuration in the GeekAI application, otherwise API calls will fail

  ng-discord: # A proxy must be configured here; otherwise, the Discord API cannot be accessed
    server: '' # Discord API proxy
    cdn: '' # Discord image CDN proxy
    wss: '' # Discord gateway proxy

  accounts: # MJ accounts, multiple can be configured
    - guild-id: ''
      channel-id: ''
      user-token: ''
      user-agent: 'Mozilla/5.0 (Windows NT 10.0; Win64; x64) AppleWebKit/537.36 (KHTML, like Gecko) Chrome/122.0.0.0 Safari/537.36'
Modify the configuration as per the instructions above. If you are unsure how to obtain the MidJourney configuration, refer to MidJourney Service Configuration. After configuring, start the service:
docker-compose up -d

# Check the logs to confirm successful startup
docker logs midjourney-proxy
If you see log information similar to the following, with the number of available accounts greater than 0, the startup is successful.
midjourney-proxy    | 2024-03-28 17:56:27.004  INFO 1 --- [           main] d.s.w.p.DocumentationPluginsBootstrapper : Documentation plugins bootstrapped
midjourney-proxy    | 2024-03-28 17:56:27.009  INFO 1 --- [           main] d.s.w.p.DocumentationPluginsBootstrapper : Found 1 custom documentation plugin(s)
midjourney-proxy    | 2024-03-28 17:56:27.046  INFO 1 --- [           main] s.d.s.w.s.ApiListingReferenceScanner     : Scanning for api listing references
midjourney-proxy    | 2024-03-28 17:56:27.215  INFO 1 --- [           main] .d.s.w.r.o.CachingOperationNameGenerator : Generating unique operation named: fetchUsingGET_1
midjourney-proxy    | 2024-03-28 17:56:27.219  INFO 1 --- [           main] .d.s.w.r.o.CachingOperationNameGenerator : Generating unique operation named: listUsingGET_1
midjourney-proxy    | 2024-03-28 17:56:27.242  INFO 1 --- [           main] c.g.n.midjourney.ProxyApplication        : Started ProxyApplication in 2.386 seconds (JVM running for 2.81)
midjourney-proxy    | 2024-03-28 17:56:29.671  INFO 1 --- [           main] c.g.n.m.s.DiscordAccountInitializer      : Current available accounts [1] - 1159363161234567
3. Configuration
Starting from version 4.1.2, the configuration method has changed significantly. The new version is much simpler.
Versions Before 4.1.2
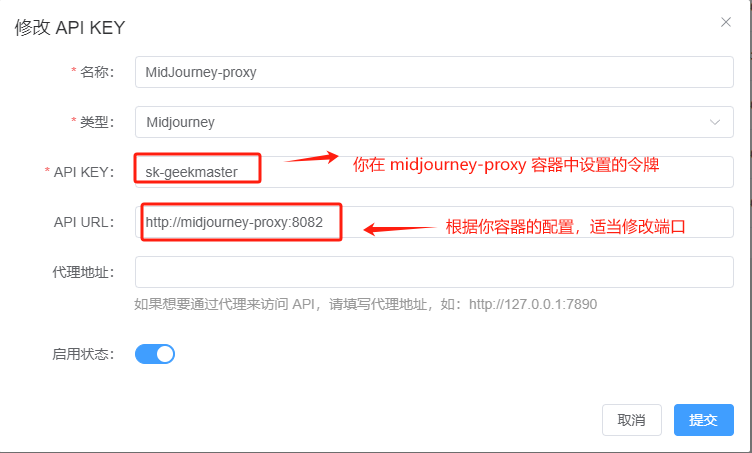
After the midjourney-proxy container starts successfully, you need to modify the conf/config.toml configuration file to include the midjourney-proxy configuration.
[[MjProxyConfigs]]
Enabled = true
ApiURL = "http://midjourney-proxy:8082"
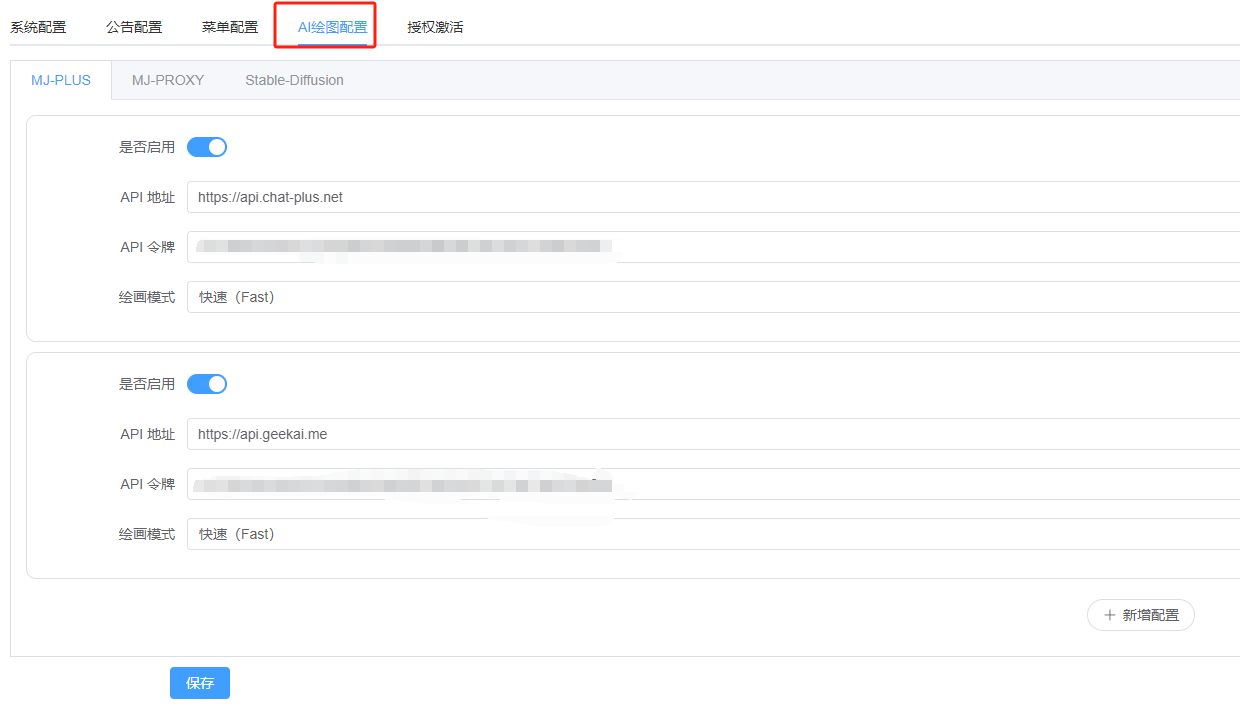
ApiKey = "sk-geekmaster"Alternatively, log in to the admin backend, go to System Configuration -> AI Drawing Configuration, and configure it there.
After configuring, restart the application for the changes to take effect:
docker-compose down
docker-compose up -d
Versions After 4.1.2
The new version of MJ configuration is very simple. You only need to add a MidJourney-type API KEY in the admin backend:
You can add multiple keys for load balancing. After adding, no restart or other actions are required; it can be used immediately.
MidJourney-Plus Service Configuration
MidJourney-Plus is a service provided by an intermediary API site. They deploy hundreds of high-speed MidJourney accounts and offer simple and reliable API services. No VPN is required; it works out of the box, is fast and stable, and affordable.
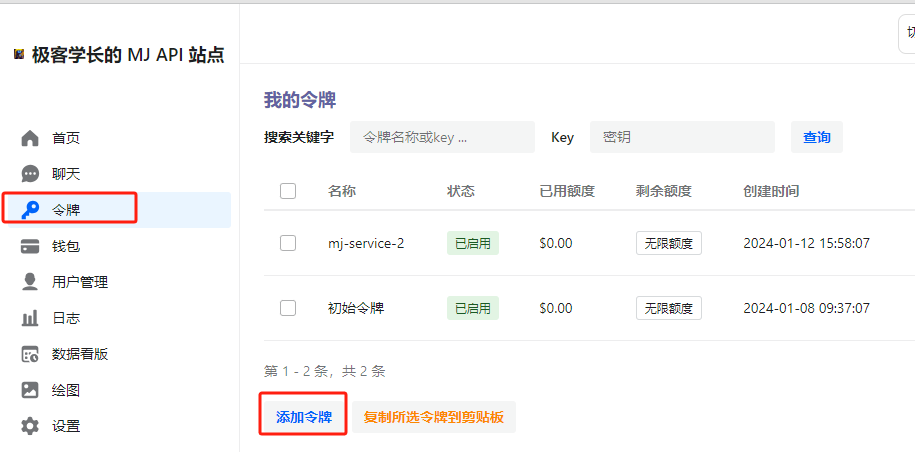
1. Creating a Token
First, you need to register an account at https://api.aiggr.com. New accounts receive a $0.5 credit. Click on the "Tokens" menu on the left -> "Add Token".
2. Configuring the Token
Starting from version 4.1.2, the configuration method has changed significantly. The new version is much simpler.
Versions Before 4.1.2
Copy the token you just created, open the GeekAI project configuration file (usually conf/config.toml), and modify the MidJourney-Plus configuration.
[[MjPlusConfigs]]
  Enabled = true
  ApiURL = "https://api.aiggr.com"
  Mode = "fast"
  ApiKey = "sk-xxxx"
Alternatively, log in to the admin backend, go to System Configuration -> AI Drawing Configuration, and configure it there.
After configuring, restart the application for the changes to take effect:
docker-compose down
docker-compose up -d
Versions After 4.1.2
The new version of MJ configuration is very simple. You only need to add a MidJourney-type API KEY in the admin backend:
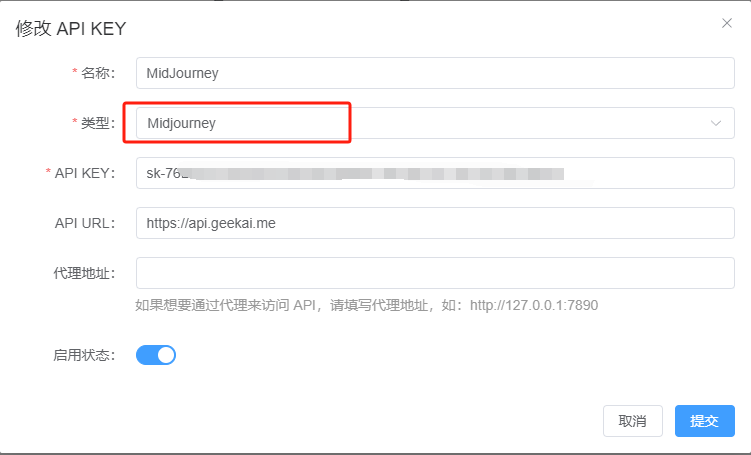
You can add multiple keys for load balancing. After adding, no restart or other actions are required; it can be used immediately.
Stable-Diffusion Parameter Acquisition
Video Tutorial:
If you prefer learning through videos, watch the Bilibili video GeekAI SD Configuration and Secondary Development Tutorial.
1. Deploying the Stable-Diffusion Service
There's not much to say here; there are many tutorials online. It is recommended to use https://github.com/AUTOMATIC1111/stable-diffusion-webui. If you are using Windows, you can also use the lazy package from Qiuye. The only thing to note is that you need to start the API service. For the official version, starting the API is straightforward; just add the --api option to the startup script.
./webui.sh --apiNote that after starting SD, the API service can only be accessed locally. If you want the SD API service to be accessible on the intranet or internet, you need to add the --listen parameter.
./webui.sh --api --listen2. Configuring SD-API
Starting from version 4.1.2, the configuration method has changed significantly. The new version is much simpler.
Versions Before 4.1.2
[[SdConfigs]]
  Enabled = true
  ApiURL = "http://xxx.com" # Configure your SD API service address
  ApiKey = "" # If SD is not configured for authorization, leave this empty
Alternatively, log in to the admin backend, go to System Configuration -> AI Drawing Configuration, and configure it there.
Tip:
If you have multiple SD servers, simply duplicate the above configuration, change the ApiURL and ApiKey, and the system will automatically add load balancing to improve concurrency.
After configuring, restart the application:
docker-compose down
docker-compose up -d
Versions After 4.1.2
The new version of SD configuration is very simple. You only need to add a Stable-Diffusion-type API KEY in the admin backend:
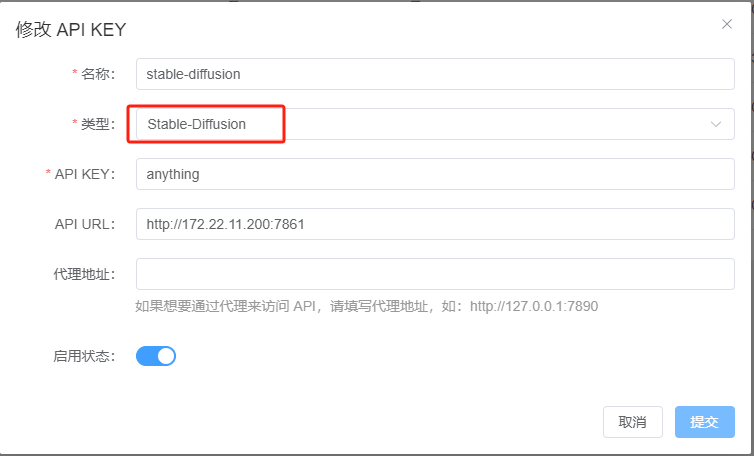
You can add multiple keys for load balancing. After adding, no restart or other actions are required; it can be used immediately.
Common Errors
- The MJ task was added successfully, but the progress hasn't changed.
First, check the logs of the GeekAI API backend to ensure the task was indeed pushed successfully.
# View container logs
docker-compose logs geekai-api|tail -n 100
# Or directly view the log file
cat logs/app/app.log
If successful, you will see logs similar to the following:
2024-07-05T15:08:21.464+0800 INFO mj/plus_client.go:70 API URL: https://api.aiggr.com/mj-fast/mj/submit/imagine
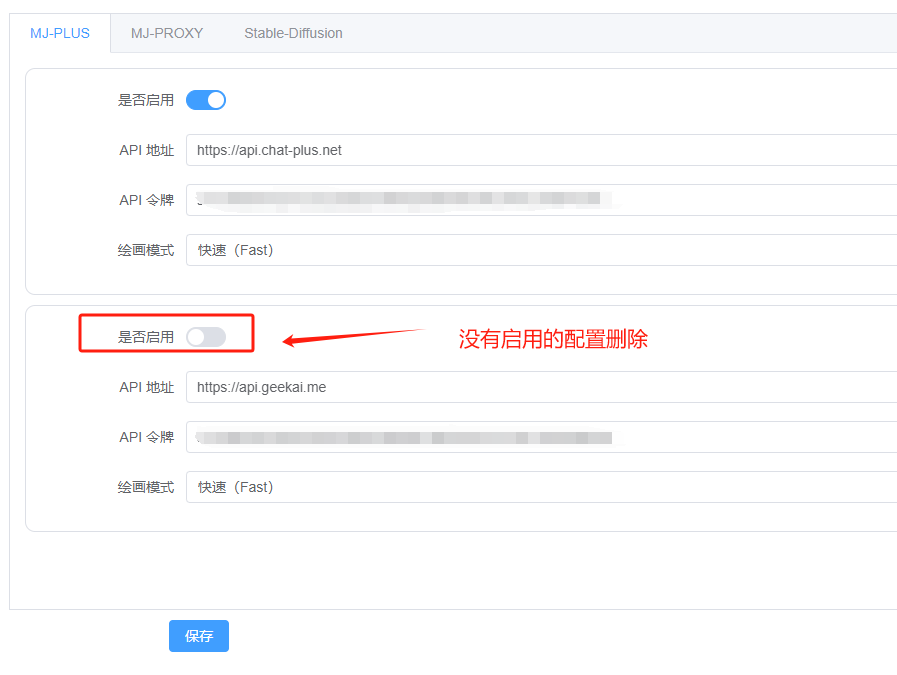
2024-07-05T15:08:25.185+0800 INFO mj/service.go:127 Task submitted successfully: {Code:1 Description:Submit success Properties:{} Result:1720163302334111}Next, check the drawing logs on the intermediary site to see if the upstream task was executed successfully. If the upstream task was executed successfully but the GeekAI application did not synchronize the task progress, try modifying the MJ-Plus configuration. Keep only one configuration and delete all other unused configurations, then restart the container.
This is a bug that was fixed in version 4.1.0.
- The MJ drawing task was executed successfully, but the image is still downloading.
If the image remains in the downloading state for a long time, it is likely that the intermediary returned a non-proxy image address but the native Discord image address. If your server is in China, the image will usually fail to download. You need to edit your token on the intermediary platform and set the image return address to "Relay" mode.
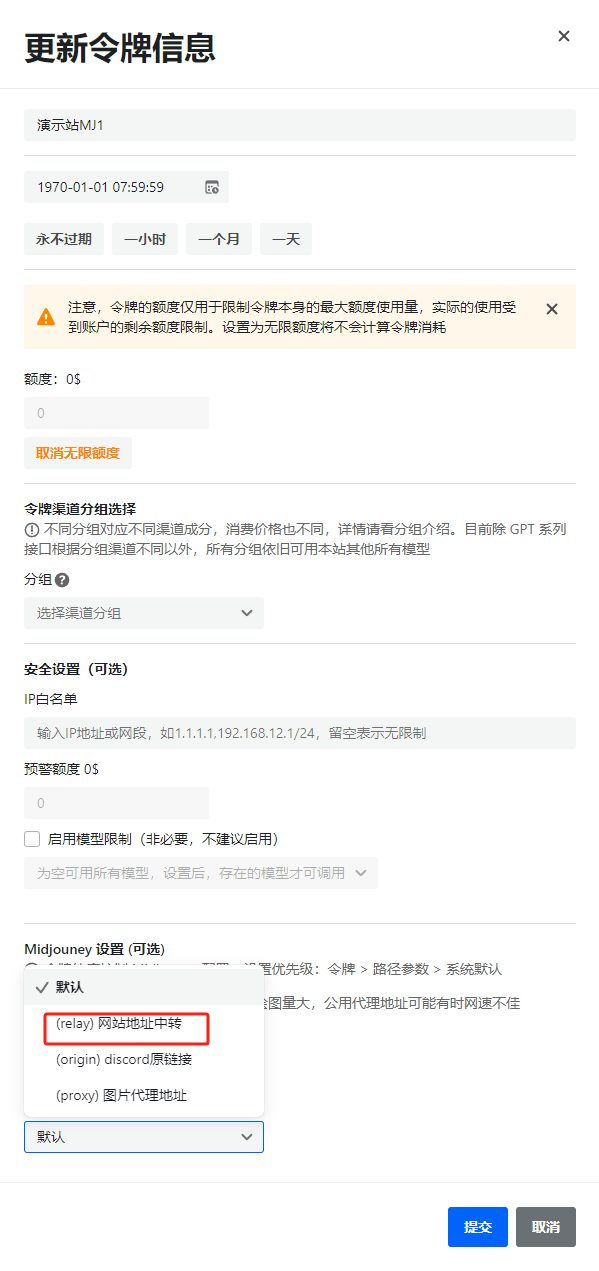
If you have a proxy server, you can also set it to proxy mode and fill in your proxy server address.