Currently, GeekAI supports the following four file storage drivers:
- Local: Local storage. Files are uploaded directly to the local server. This is the default storage method and requires no dependencies or configuration. The local storage service automatically compresses large images and generates thumbnails, which may consume significant CPU resources.
- Minio: Minio OSS storage. You need to set up a MinIO storage service locally and configure the authorization information in the Minio section of config.toml.
- QiNiu: Qiniu Cloud OSS storage. You need to configure the authorization information for Qiniu Cloud OSS.
- AliYun: Alibaba Cloud OSS storage. You need to configure the authorization information for Alibaba Cloud OSS. The file storage service is primarily used to store images created by AI (e.g., MJ, SD), user avatars, and uploaded files. If possible, it is recommended to use third-party commercial OSS services like Alibaba Cloud or Qiniu Cloud to minimize server overhead.
The specific OSS configuration in GeekAI is as follows:
[OSS]
  Active = "Local" # Choose which storage driver to use
  [OSS.Local]
    BasePath = "./static/upload"
    BaseURL = "/static/upload"
  [OSS.Minio]
    Endpoint = "{domain|IP}:9000"
    AccessKey = "BXVYJCNSALQG2V6EB7HD"
    AccessSecret = "sR6GJWDhXfLOgElTJQN0cutdCO3uKmt+ZB00AYmE"
    Bucket = "geekai" # Storage bucket name
    UseSSL = false
    Domain = "http://{domain|IP}:9000"
  [OSS.QiNiu]
    Zone = "z2"
    # Obtain the following key information from https://portal.qiniu.com/developer/user/key
    AccessKey = ""
    AccessSecret = ""
    Bucket = "geekai"
    Domain = "" # Domain bound to the bucket
  [OSS.AliYun]
    Endpoint = "oss-cn-hangzhou.aliyuncs.com"
    # Obtain Alibaba Cloud API service key information from https://ram.console.aliyun.com/profile/access-keys
    AccessKey = ""
    AccessSecret = ""
    Bucket = "geekai" # Storage bucket name
    Domain = "" # Domain bound to the bucket
Note: Except for local storage, the other storage methods require setting a Domain parameter, which is the domain bound to your OSS for external access. Otherwise, images may upload successfully but fail to load in the browser.
Qiniu Cloud OSS Configuration
1. Obtain Keys
First, go to the Qiniu Cloud Key Management page, create a new key, and obtain the AccessKey and AccessSecret information.

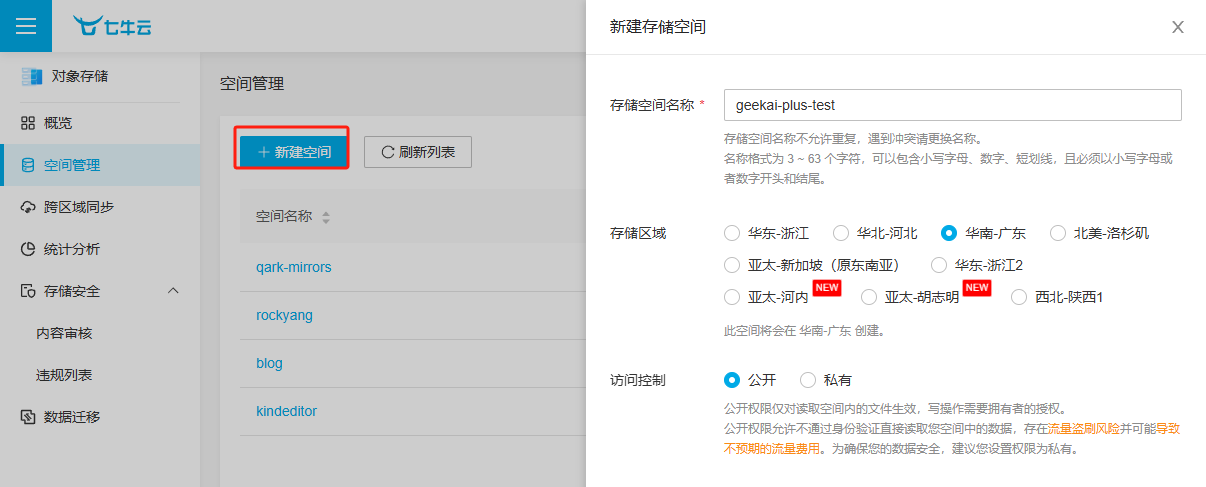
2. Create a Storage Bucket
Go to the Bucket Management Page, click the Create button, fill in the relevant information, and create a Bucket. Enter the Bucket name, select the region, and set the access permission to Public.
3. Bind a Domain
For the newly created bucket, select Domain Management. The Domain here is the custom domain or CDN acceleration domain bound to the Bucket.
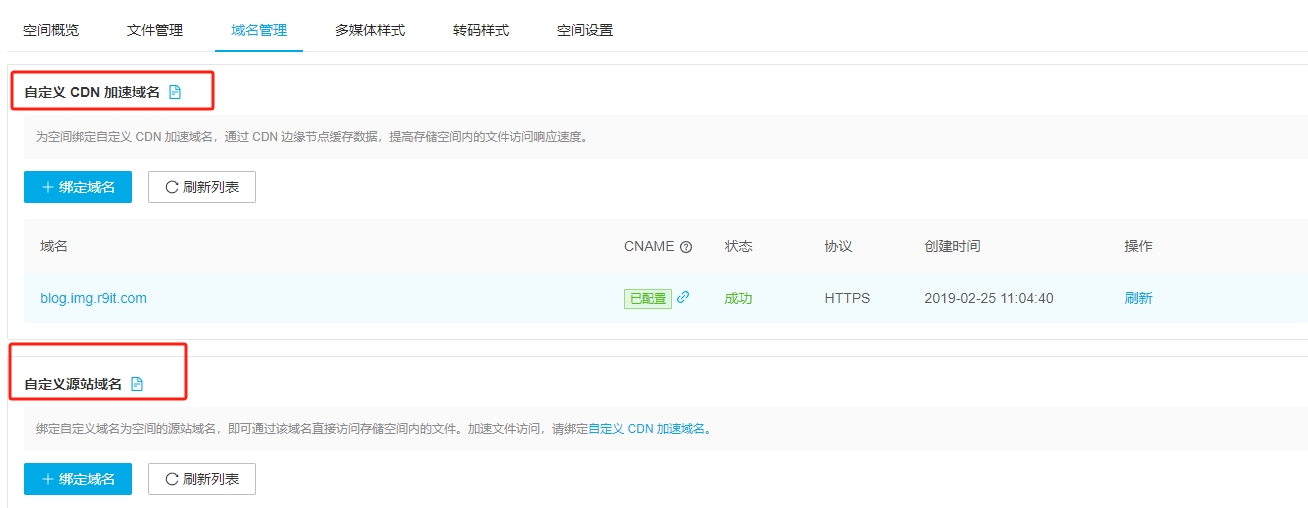
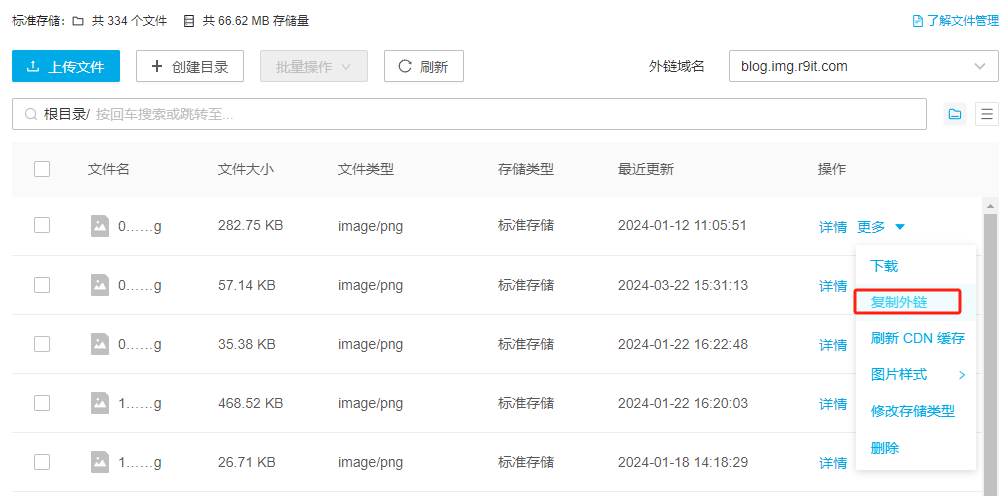
Alternatively, you can select any image, copy its external link, and the domain in the copied address is the domain bound to your resources for external access.
Finally, fill the obtained AccessKey, AccessSecret, Bucket name, and other information into the OSS configuration section:
 [OSS.QiNiu]
    Zone = "z2" # South China: z2, East China: z0, North China: z1, North America: na0, Singapore: as0
    AccessKey = ""
    AccessSecret = ""
    Bucket = "geekai"
    Domain = "" # Domain bound to the bucket
Alibaba Cloud OSS Configuration
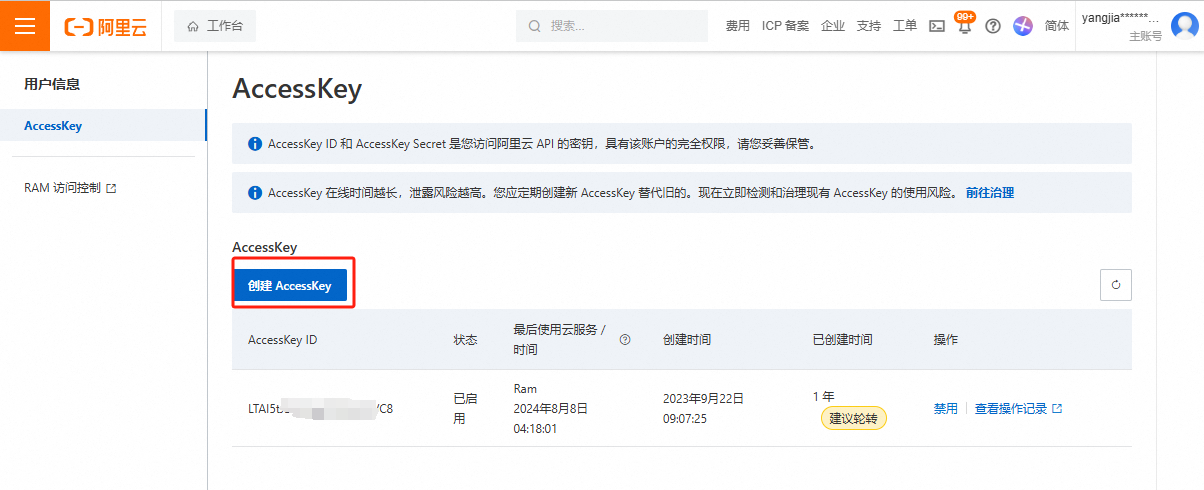
1. Obtain Keys
Log in to Alibaba Cloud and go to the AccessKey Management page to create a new AccessKey.
2. Create a Storage Bucket
Go to the Bucket List, click the Create Bucket button, fill in the relevant information, and create a Bucket.
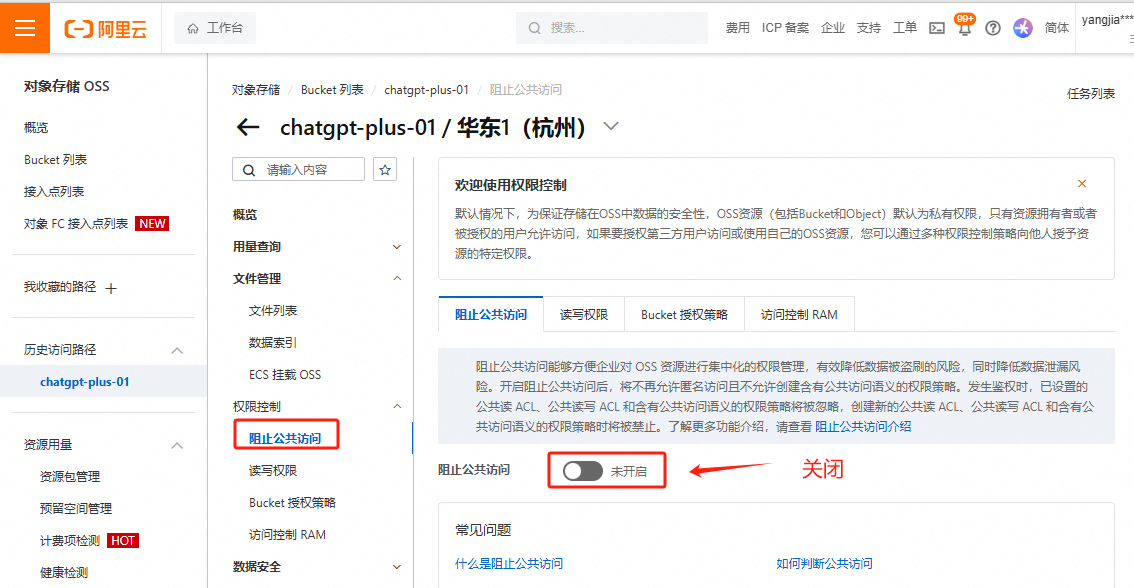
Then, click the newly created Bucket to enter its configuration page. Configure the Bucket permissions by first disabling the "Block Public Access" feature.
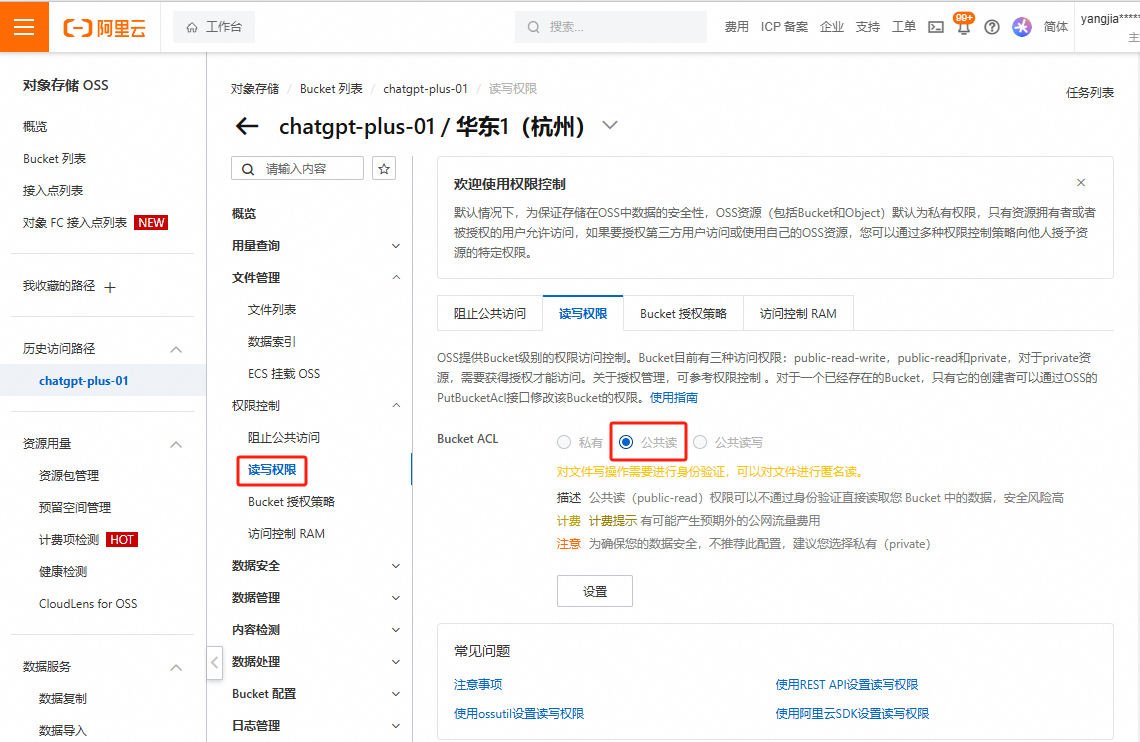
Next, under the "Read/Write Permissions" menu, select Public Read.
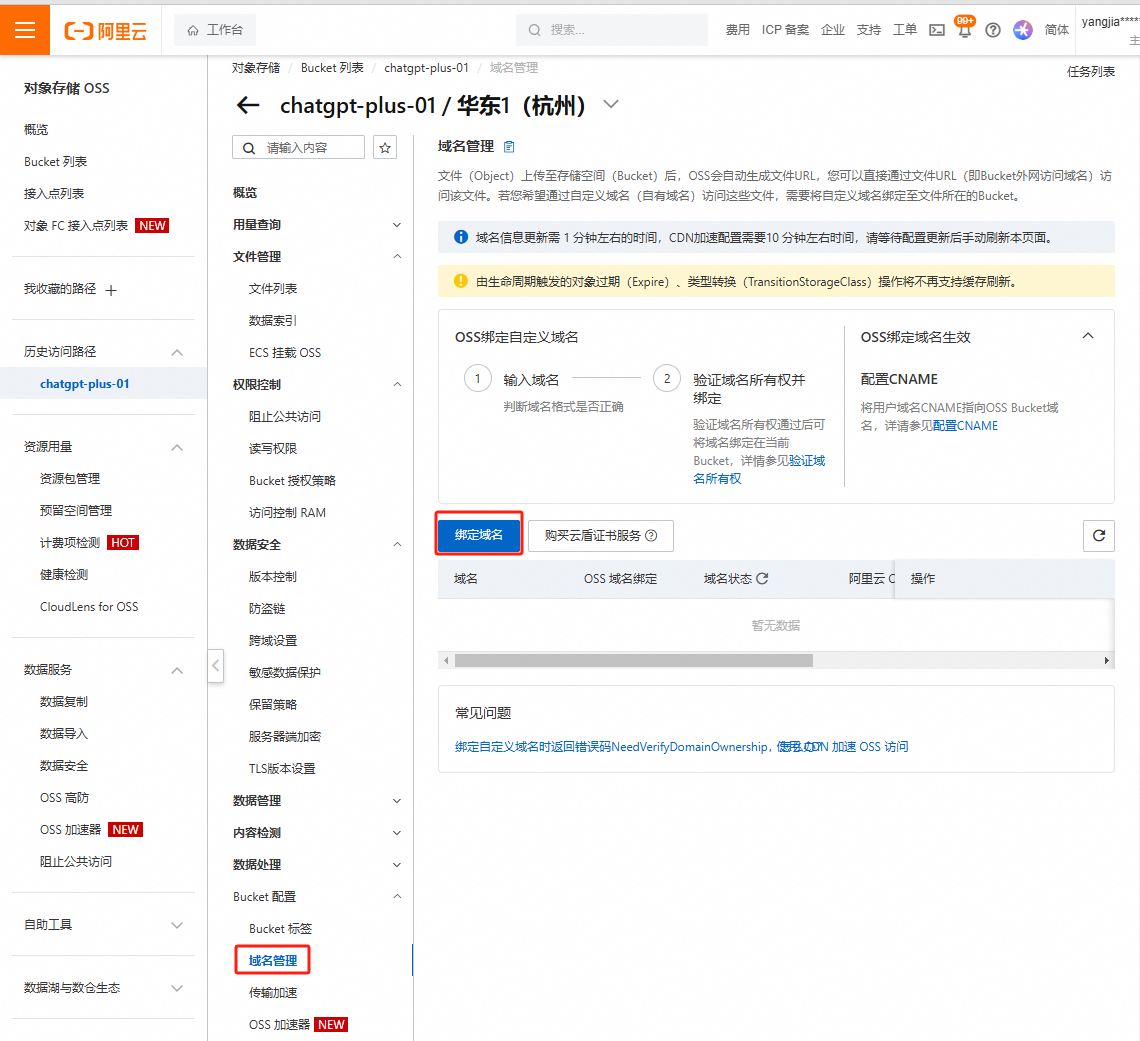
3. Bind a Domain
Click the "Bucket Configuration" menu, then click "Bind Domain," enter the domain to bind, and follow the prompts to complete domain verification.
Finally, fill the obtained AccessKey, AccessSecret, Bucket name, and other information into the OSS configuration section:
 [OSS.AliYun]
    Endpoint = "oss-cn-hangzhou.aliyuncs.com"
    AccessKey = ""
    AccessSecret = ""
    Bucket = "geekai" # Storage bucket name
    SubDir = ""
    Domain = "" # Domain bound to the bucket
Set Up Minio Storage Service
Whether it's Qiniu Cloud or Alibaba Cloud OSS, you need a registered domain to bind and use them. If you don't have a domain, consider setting up a Minio storage service yourself.
First, create a docker-compose.yaml file and copy the following content into it:
services:
  minio:
    image: registry.cn-shenzhen.aliyuncs.com/geekmaster/minio:latest
    container_name: minio
    restart: always
    volumes:
      - ./data:/data
    ports:
      - '9010:9000'
      - '9011:9001'
    environment:
      MINIO_ROOT_USER: minio
      MINIO_ROOT_PASSWORD: minio@pass
    command: server /data --console-address ":9001" --address ":9000"
Start the container:
docker-compose up -dAfter the container starts, log in to the Minio console, create a Bucket, and generate Access Keys. Then, configure the corresponding parameters in the config.toml file.
Access http://localhost:9001 in your browser and log in to the Minio admin console using the default username and password (minio/123456).
Create an Access Key:

Create a Bucket:

Typically, you need to bind a domain to the Minio gateway service for API calls and image loading. The simplest method is to resolve a domain (e.g., oss.abc.com) to your Minio server and access the Minio API via http://oss.abc.com:9000.
Alternatively, you can use Nginx as a reverse proxy to access it via https://oss.abc.com.
Finally, fill the corresponding information into the OSS configuration section:
 [OSS.Minio]
    Endpoint = "oss.abc.com:9000"
    AccessKey = "BXVYJCNSALQG2V6EB7HD"
    AccessSecret = "sR6GJWDhXfLOgElTJQN0cutdCO3uKmt+ZB00AYmE"
    Bucket = "geekai"
    SubDir = ""
    UseSSL = false # If you use HTTPS, change this to true
    Domain = "http://oss.abc.com:9000"
Error Handling
- Image uploads successfully but does not display
First, if you are using a third-party OSS storage, ensure the storage bucket is set to public. For example, in Qiniu Cloud, configure it under the "Access Control" module in the bucket settings.

Second, ensure the domain in the GeekAI OSS configuration is correct:
[OSS.QiNiu]
    Zone = "z2"
    AccessKey = ""
    AccessSecret = ""
    Bucket = "kindeditor"
    SubDir = "geekai"
    Domain = "http://ai.r9it.com"
You can open the browser console (press F12). If the image fails to load, the console will display an error, usually including the image URL. Verify if the domain matches your settings.